Curries & Dals · Uncategorized

Tofu, lentil and courgette curry

tofu curry

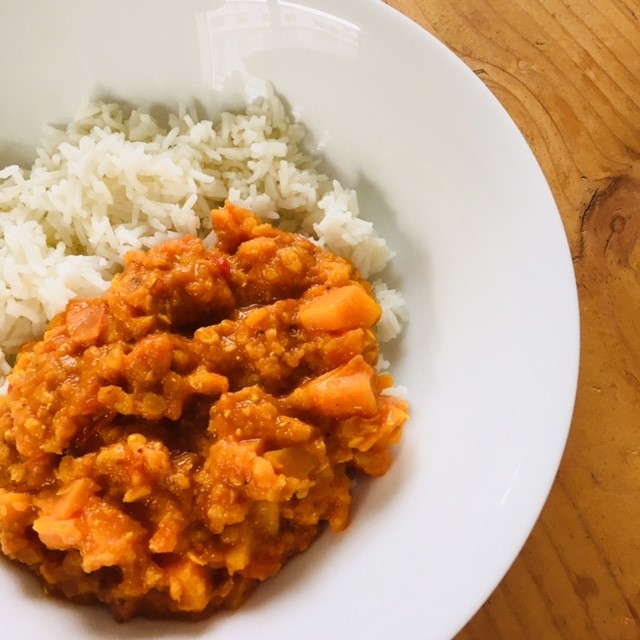
Here’s a quick and tasty curry for weeknight dinners!

I find many people I speak with (both plant based & meat eaters!) are often confused as to what tofu is and how to add it to recipes. Unfortunately as a result they end up avoiding it, which is such a pity as it’s such a versatile ingredient with many health benefits.

Tofu is made from soya beans and is a great alternative source of protein with many nutritional benefits such as-amino acids, iron,calcium, magnesium and many other vitamins and minerals.

cropped-veg-basket.jpg

It has quite a neutral flavour, that’s what makes it so great for cooking with, as it acts like a sponge, absorbing marinades and sauces….making it the perfect addition to all kinds of dishes; curries, stir fries and broths, such as my Mushroom, brown rice and broccoli leaf broth!

A2420B39-F742-4FB1-B588-367D54BEB2BC

Why not add tofu to your shopping list this week and give it a try!

Ingredients:

1 onion

thumb size piece of ginger

4 cloves of garlic

1 can of green lentils

1 courgette

1 block of tofu

1 scant teaspoon turmeric

3 teaspoon curry powder

1/2 can full fat coconut milk

1/2 cup of water

Method:

  1. Peel and finely chop onion, add to a large sauce pan with a drizzle of olive oil and a pinch of salt,cook until soft, about 10 minutes.
  2. Peel and grate garlic and ginger, add to onions and cook for a further 5 minutes.
  3. Add spices to onion mix, cook off for 5 minutes.
  4. Chop the courgette into cubes, add to onion mix and stir well.
  5. Drain the tofu and cut into rough cubes.
  6. Add tofu and all other remaining ingredients to the saucepan.
  7. Bring the mixture to the boil, then reduce the heat and cook for 25 minutes.
  8. Serve with brown rice or quinoa.

This recipe will store well in a fridge for 3-4 days.

I hope you enjoy this recipe, please let me know if you try it and tag me on Instagram @kitchentablebaking!

Peace and love,

G xx

Dessert · Poached fruit & compotes · Uncategorized

Porridge toppings-Poached pears

It’s always a little harder getting up on these cold dark mornings, but knowing there’s a super tasty breakfast waiting makes it a little easier…..these poached pears on top of a bowl of a hot porridge will have you jumping out of bed!


Poached pears 2

As previously mentioned in my Morning self care & kale smoothie recipe breakfast is my favourite meal of the day and I never miss it! Even if I’m travelling and know I won’t have much time the following morning to sit down and eat, I don’t skip it. I simple prep a batch of my Cacao overnight oats recipe or my Banana bread baked oats and bring breakfast with me on the go.

I most often than not have an oat based breakfast as I find oats filling and versatile, for me there is nothing more comforting or inviting in the morning than a bowl of hot porridge topped with fruit, seeds, nut butter and a drizzle of maple syrup….its like a big warm belly hug!

In order to keep variety with my porridge, I make sure to have plenty of different toppings prepared….compotes, granola and toasted seeds are my favourites. However, recently I ordered pears in my local veg box and unsure what to do with them I decided to poach them….what a good idea that was, as they turned out super tasty.

If you’re not a breakfast person a suggest your try out this recipe, I bet you’ll be quickly converted!

Ingredients

4-5 pears (I used conference)

2 medjool dates

250ml boiled water

1-2 tablespoons coconut sugar ( or maple syrup)

1 teaspoon mixed spice/ pumpkin spice


Method:

  1. Place water, sugar,dates and spice into a small/medium saucepan and bring to boil. Once boiling reduce heat and stir until sugar is dissolved. Once softened mash dates into liquid.
  2. Meanwhile peel pears and use a melon baler to scoop out the cores.
  3. Add pears to liquid, bring liquid back to boil and then reduce to a low simmer, cook pears until soft, 5-7 minutes ( You want the pears to retain their structure).
  4. Remove from heat, transfer pears and liquid to a container and leave to cool.
  5. Serve on top of porridge or with a spoon of coconut yogurt and a sprinkle of granola.

This recipe will store well in a fridge for 3-4 days.

I hope you enjoy this recipe, please let me know if you try it and tag me on Instagram @kitchentablebaking!

Peace and love,

G xx

P.s I’ve entered the UK Blog Awards 2019 & would really appreciated your vote, you can vote here!

A505B879-4504-4341-B0BD-2CB644F47B37


Curries & Dals · Lentils · Uncategorized

Autumn walks & Sweet potato and lentil curry recipe!


Autumn is definitely my favorite time of year! Maybe it’s the fact that I was born in Autumn, I just love the crisp frosty mornings, the changing colours of the leaves and all the seasonal produce!

However, I must admit, I really miss Ireland in particular in Autumn….at home this time of the year I would be busy picking blackberries and apples…making jams, chutneys, tarts and crumbles….going for a  walk in the woods….listening to the leaves crunch underneath my boots and preparing the garden for winter….coming in from the cold to bowls of soups and stews….warming up in front of the fire….it’s my idea of bliss and it’s where my heart belongs this time of year!

That said, I am very grateful for all that I have here and all that I’ve learned. I am also very grateful that I live by the sea, where I can go for lovely long walks on cool crisp Autumn evenings, come home to a warm apartment and eat bowls of warm nutritious food, much of which is locally sourced through my local veg box scheme.

I love how the food transitions from summer to Autumn….from cooling crunchy salads to belly warming dishes filled with spices and chunky veg! For me, as soon as the weather starts to turn cooler my body immediately craves curries…curries bring natural warming affects to the body through the blend of spices we put into them, many of which are also healing to our bodies, particularly turmeric. Turmeric is a natural inflammatory and great for aiding recovery from colds and flues this time of the year.

Curries are one of my favourite meals, as I’m sure you can tell by the many curry recipes I have on here, if you haven’t already be sure to check them out!

Gina’s Dal

Mung bean and sweet potato curry

Red lentil, pea and turnip curry

Sweet potato, spinach and lentil curry

I hope you enjoy this curry recipe too. I think it’s my favourite to date!


sweet-potato-lentil-curry-2.jpg


Ingredients:

1 medium onion

3-4 garlic cloves

1 thumb size piece of ginger

2 teaspoon curry powder

1 teaspoon black mustard seeds

1-2 teaspoon garam masala

1 can tomatoes

1/2 can coconut milk

1/2 cup red lentils

2 sweet potatoes

1/2 can water

Sea salt

Method:

  1. Peel and finely chop onion, add to a large sauce pan with a drizzle of olive oil and a pinch of salt, cook until soft, about 10 minutes.
  2. Peel and grate garlic and ginger, add to onions and cook for a further 5 minutes.
  3. Add spices to onion mix, cook off for 5 minutes.
  4. Peel sweet potato one inch cubes, add to onion mix and stir well.
  5. Add all other remaining ingredients to the saucepan.
  6. Bring the mixture to the boil, then reduce the heat and cook for 25 minutes or until sweet potato and lentils have softened, be sure to check the mixture every few minutes to avoid the lentils sticking to the saucepan.

Serve with quinoa or brown rice.

Recipe will store well in the fridge for 3-4 days or portion up and freeze for up to 3 months.

I hope you enjoy this recipe, please let me know if you try it and tag me on Instagram @kitchentablebaking!

Peace and love,

G xx


Grain Salads · Kitchen tips & tricks · Quinoa · Uncategorized

How to cook the perfect quinoa

quinoa 2

I know, I know….bit of a bold title, but I find this method really does produce the perfect quinoa, with a light and fluffy texture. Trust me, it took me awhile to achieve perfectly cooked quinoa, I’m not sure why but it always went mushy on me! But thankfully through much trial and error I have successfully mastered a fool proof method, well I hope I have!

Quinoa is one of my favourite grains,  I always have a bag in the kitchen, its one of my store cupboard essentials as I previously mentioned in My top 10 store cupboard essentials post. Not only is it gluten free, it’s also packed with nutrition, providing a good source of complex carbohydrate and a source of plant protein. Quinoa is also super versatile grain, you can add it to salads, dinners and even add it to your breakfast, I often add a spoon or two to my morning porridge for extra nutrition and texture.

I have a few quinoa recipes already on my blog Lunch box fillers-Quinoa, beetroot, apple and lentil salad & Quinoa, broad bean and mint salad and a few more to come, be sure and check them out!

quinoa 1

Here it is…the perfect method for cooking quinoa!

Ingredients:

1 cup quinoa

2 cups cold water

Method:

  1. Place quinoa in a sieve and rinse well under cold water, this removes the starch from the quinoa preventing it from going sticky.
  2. Place quinoa and water in saucepan and bring to boil.
  3. Set timer for 10 minutes.
  4. Once boiling, reduce to a medium heat and cook until all water is evaporated, this may take up to 12-15 minutes.
  5. Once all water has evaporate remove saucepan from heat and place lid firmly on pot, allow to steam in its own heat for another 10 minutes.

I hope you find this post helpful, please let me know if you try it and tag me on Instagram @kitchentablebaking!

Peace and love,

G xx


Lentils · Uncategorized · Vegetable stews

Roast vegetable and lentil stew

garden 6
Home grown & local produce-picture styled and taken by my Mum & Dad

I spent last week at home in Ireland with my family, I had such a lovely relaxing stay, going for lots of walks and spent time in the garden but one thing I will say is…….it was FREEZING over there! The cold Irish weather really made me crave warming stews and soups, with that, I got cooking in the kitchen and managed to rustle up a few new recipes.

This is a really hearty stew and is great for meal prepping ahead of time, it takes little effort to throw together on a Sunday evening, ready for the week ahead. It’s also a very versatile dish, it can be served with pasta, rice and quinoa or even made into a vegetable lasagne.  It also pairs really well with eggs and is delicious served with two poached eggs and a side of sourdough or served as shakshuka, by placing it into an oven proof dish, cracking the eggs on top and cooking it at 180c until the eggs are set.

I made a big batch the first day I was home and it was the perfect comfort food in the evenings to warm up after a long walk with my dog(aka puppy or princess Ellie!)


Ingredients:

Serves 4

2-3 red onions

2 courgettes

1 aubergine

1 bulb of garlic

1 can of tomatoes

1 carton of passata

1 tablespoon maple syrup

2 teaspoon mixed herbs

1 teaspoon of oregano

1 teaspoon cumin

200g canned green lentils (drained and rinsed)

Method:

  1. Chop red onions, courgette and aubergine into cubes, add to a lined baking tray and drizzle with olive oil, sprinkle with cumin and a pinch of salt. Drizzle garlic with a little olive oil, wrap separately in tin foil and place on tray. Bake at 180c for 25-30 minutes, or until all vegetables are soft.
  2. Place canned tomatoes, passata, maple syrup, herbs and lentils into a medium/large saucepan and place on a medium heat.
  3. When cooked, remove vegetables from oven and add to tomato sauce. Remove garlic from tin foil and mash 3-4 medium cloves with a fork, add to tomato sauce. (The remaining garlic can be stored in the fridge for up to five days and used to make garlic butter for garlic bread or added to further sauces.)
  4. Bring stew to boil, reduce heat and cook on low/medium for 20 minutes, stirring every so often.
  5. Serve with pasta, rice or quinoa.

This stew will keep well for up to four days in the fridge or can be frozen for up to 3 months.

I hope you enjoy these recipes, please let me know if you try it and tag me on Instagram @kitchentablebaking!

Peace and love,

G xx


Curries & Dals · Uncategorized

Sweet potato, spinach and lentil curry

1A473533-4B96-4432-88C4-FD915620CE77

I found myself with a few bits in the kitchen to use up this week (spinach and sweet potatoes in particular), which led to the creation of this dish!

This dish is great for meal prepping as it’s a one pot wonder and costs little to make! I know I’ve mentioned it in previous posts but just in case you’re new…..I’ll mention it again, I did a post awhile back on My top 10 store cupboard essentials!

If you’ve time pop over and have a read, I go through the staples I always have in my cupboards, one of which are red lentils, the main ingredient of this dish. I always keep green and red lentils in the cupboard for a quick low cost, high nutrition meal. Lentils are a great source of plant based protein as well as fibre, vitamins and minerals.

I’m a big fan of meal prep, cook once and eat many times….who doesn’t love that! Meal prep saves money, time and personally I find it’s great for keeping me on track with eating healthy during the week!

Anyways that’s enough of my babbling, below is the recipe and I hope you find time to try it this week!

Ingredients:

Serves 6 ( 250g portions)

2 onions

4 garlic cloves

Thumb size piece of ginger

1/2 red chilli

1 large sweet potato

200g baby spinach

2 tablespoons of curry powder

1 teaspoon black mustard seeds

260g red lentils

800ml of water

Method:

  1. Peel and finely chop onion, add to a large sauce pan with a drizzle of olive oil and a pinch of salt,cook until soft, about 10 minutes.
  2. Peel and grate garlic and ginger, add to onions and cook for a further 5 minutes.
  3. Add mustard seeds and curry powder to onion mix, cook off for 5 minutes.
  4. Peel sweet potato and chop into large chunks, place into a food processor and pulse until finely diced. Add to onion mix, and cook for 5-10 minutes.
  5. Add lentils and 3/4 of the water to saucepan.
  6. Bring the curry to a boil, then reduce heat and cook on low heat for 30 minutes or until red lentils have softened, add remaining water during cooking, if needed.
  7. Finally remove from heat and add the spinach and stir through until wilted.
  8. Serve with brown rice or quinoa.

This recipe will store well in fridge for 3-4 days or portion up and freeze for up to 3 months.

I hope you enjoy this recipe, please let me know if you try it and tag me on Instagram @kitchentablebaking!

Peace and love,

G xx

Dessert · Poached fruit & compotes · Rhubarb, vanilla and granola pops · Uncategorized

Rhubarb compote & rhubarb, vanilla and granola pops!

4B8B96C1-26E2-4683-93CD-513FA9919D10

Yay for rhubarb season!!! I used to hate rhubarb growing up, it’s only as I’ve got older that I developed a taste for it!

This is a quick, simple and versatile rhubarb recipe. There are so many uses for rhubarb compote, here’s a few suggestions:

  • Add a spoon to your morning porridge
  • For a little midday snack add a spoon to yogurt and top with granola
  • Stir a couple of spoons through cream or yogurt along with crushed meringue for a quick rhubarb fool
  • Use as a filling for a victoria sponge cake
  • Make into ice pops (see recipe below)

3D0D79E0-BC89-4DDF-BB8D-257A47EB42ED

Ingredients

(Makes 1 small jar)

250g Rhubarb

30g sugar

30ml water

Method:

  1. Peel and chop rhubarb in roughly 1cm slices.
  2. Place all ingredients in a small saucepan and place over a low/medium heat for 10-15 minutes until rhubarb has soften and broken down slightly (add more water if necessary). Do not walk away from the mixture, as it can quickly burn.
  3. Taste- if rhubarb is too tart add a little extra sugar and stir mixture until dissolved.
  4. Remove from heat and allow to cool.

Variations:

  • Add a piece of finely chopped stem ginger to the mixture when cooking.
  • Replace water with orange juice
  • Add a few chopped strawberries to the mix when cooking.


Rhubarb, vanilla and granola pops

EC63A307-09F7-4F4B-B1DB-66E7F476B119


Here’s a slightly healthier ice pop for these warm summer days!

Ingredients:

Makes 4

400g vanilla yogurt (I used Alpro vanilla yogurt)

1 tablespoon rhubarb compote (see recipe)

1 tablespoon of granola

Method:

  1. Mix all ingredients together in a bowl and spoon into ice pop moulds (You will find these moulds in homeware stores, if you cannot find them use small paper cups). Place lollypop sticks into centre of each pop.
  2. Place in freezer and leave to set overnight.
  3. The following morning remove pops from moulds. I find the best way to do this is to leave the pop sitting out on the counter for 5 minutes, often they start to come away themselves. However if they don’t, either turn the moulds sideways and run them under the hot tab or fill a container with hot water and sit them in it for 1-2 minutes.
  4. When all pops are removed from mould wrap each one in parchment paper, place them in a sealed bag and pop them in the freezer to use as you need.

I hope you enjoy this recipe, please let me know if you try it and tag me on Instagram @kitchentablebaking!

Peace and love,

G xx


Baked beans · Beans · Uncategorized

“Baked beans”

025B4353-D730-4F04-AD4D-FB49E9766FF0

Myself and K are just back from a trip in Barcelona and I’m still in holiday mode! We had such a beautiful week sightseeing and eating, I’ll hopefully put up a post of some of the spots we visited in the coming week as well as a holiday inspired  recipe!

Anyways back to the point! It was great to have the freezer full to ease me back into routine, there’s nothing more comforting than baked beans, I always have a batch in the freezer to have for lunches and dinners during the week.

Not only are beans super versatile, they are also packed with nutrition and provide a great source of protein and fibre to your diet. This recipe takes little time to throw together and is packed with flavour!

I know I always say it but meal prep is well worth the effort, putting aside an hour or two at weekend to prep food for the week ahead will really help you stick a healthy eating routine during the week and free up time to get out and about for a walk or focus side projects!

Be sure and pop this recipe on your meal prep list this weekend!

Baked beans

Serves 6

1 large onion

2 garlic cloves

500g passata

2 cans of cannelloni beans

2 tablespoons maple syrup

1 tablespoon worcestershire sauce

1 teaspoon cumin

1/2 teaspoon coriander

1 tablespoon ketchup

Method:

  1. Peel and finely chop onion, add to a medium saucepan with a little oil or water and cook until softened, 6-8 minutes.
  2. Peel and finely chop garlic, add to onion mix and cook for a further 3-4 minutes.
  3. Add all other ingredients and cook on a medium heat for 20 minutes, you want the beans to soften and the sauce to reduce slightly.

This recipe will store well in a fridge for 3-4 days or you can portion it up and freeze for up to 3 months.

I hope you enjoy this recipe, please let me know if you try it and tag me on Instagram @kitchentablebaking!

Peace and love,

G xx


Overnight oats · Uncategorized

Cacao overnight oats recipe

80135E55-183D-4C25-95AC-4BA100826A40

Happy Easter everyone!

I hope you’re all enjoying the break and taking time out to relax. Following on from my Morning self care & kale smoothie recipe blog post, here’s another super quick and nutritious breakfast recipe!

This overnight oats recipe is one of my favourite breakfast/snack at the moment, it’s pudding like texture makes it taste so indulgent! It’s also a great breakfast for on the go, as you prepare it the night before, just pop it in your bag the following morning and eat it on the way to or at work! I also love overnight oats as a post work out snack, as oats are complex carbohydrates, offering a slow sustainable release of energy, perfect for refueling.

Also as previously mentioned in my Morning self care & kale smoothie recipe post, breakfast is one of the most important meals of the day, it is important that you set your body up with a nutritious breakfast to fuel it for the day ahead (Don’t skip it!).

Overnight oats are a great addition to your weekend meal prep, as they hold up to three days in the fridge, which will sort out breakfast Monday to Wednesday, then you can switch it up or make another batch Wednesday evening!

I hope you find time to try out the recipe this week!

Cacao overnight oats

Serves 1

100g oats (I use gluten free)

5g chia seeds (or 1 heaped teaspoon)

10g cacao (or 2 teaspoons)

10ml maple syrup (or 2 teaspoons)

180-200ml rice milk

10g protein powder (or 2 teaspoons, this is optional)

Method:

  1. Place all ingredients in a clean jam jar and mix well.
  2. Place in fridge overnight.

I hope you enjoy this recipe, please let me know if you try it and tag me on Instagram @kitchentablebaking!

Peace and love,

G xx


Tofu dishes · Uncategorized

Weekly reflection & quick nutrient packed Friday night dinner!

BD5FB016-6662-4748-9B94-54373721BBAE

Wooooo, we did it we made it to Friday! Hopefully everyone had a good week and that it wasn’t to stressful?! Let’s be honest, no week is ever really perfect, it’s not possible for every little thing to work out, but that’s okay, it’s how we reflect on what happened is what matter’s.

I’m the first to criticize myself when things don’t go according to plan, but what’s that really achieving?……More stress, more pressure, more negative energy etc.

Rather than looking back on all the things that didn’t quite work out over the week why not firstly look back on all that did and celebrate them, tell yourself ‘job well done’, even the small things such as the healthy meal you cooked or the exercise you did, big or small they all count as accomplishments in my book!

By reflecting on the positive things first, it changes our mindset, often we have achieved more than we realise and accomplished more things than we thought, this creates a sense of pride and builds confidence, rather than constantly breaking ourselves down!

Now look at those things that didn’t go so well, hopefully they won’t seem as overwhelming. Don’t focus on the fact that they didn’t work out, look at the contributing factors surrounding those moments, is there anything that you could do to possibly set the situation up differently? I find the following tools really helpful if I’m in a situation where I feel I’m a little overwhelmed or when things aren’t going according to plan!

-Taking a moment to step back and focusing on slowing down my breathing

-Managing my time a little better

-Writing a list of what needs doing and planning out time slots to fit things in

-Going for a walk, getting some fresh air and refocusing

-Meal prepping for the really busy days

These are all just suggestions based on reflecting back over my own week, everybody is different, take time to work out what works for you, write a list of tools you can implement into your days to take some pressure off when things aren’t going so well.

The main thing to remember is to focus on the good parts of the week rather than the bad, release any negative energy and thoughts from week that has passed and allow yourself to relax and enjoy the weekend, we’ve all worked hard and deserve a rest!

On that note, here’s a quick little recipe for Friday dinner, it’s fuss free, takes minutes to prepare and is bursting with nutrients, exactly what you need after a busy week!

Broccoli, pak choi and tofu stir fry with brown rice noodles

Serves 2

1 head of broccoli

1 head of pak choi

1 block of firm tofu

2 portions of noodles( I use king soba brown rice noodles)

Sauce

3 tablespoon soya sauce

1 teaspoon siracha( or 2 if you like heat)

3 teaspoon maple syrup/honey

2-3 tablespoons of water

Method:

  1. Add all sauce ingredients to a bowl and mix well then leave to one side.
  2. Drain the tofu and chop into 1cm cubes, place in a large pan with a tablespoon of olive oil and fry until lightly coloured.
  3. Wash and chop broccoli and blanch in boiled water until soft, 5-6 minutes.
  4. Boil noodles according to packet instructions, usually 7-9 minutes.
  5. Prepare pak choi, finely chop leaves and stems, add stems to the tofu, reserving leaves until later. Cook for 3-4 minutes, until softened.
  6. Drain broccoli and add to tofu mixture, along with pak choi leaves, then add sauce, cook for 2-3 minutes.
  7. Drain noodles and add to stir fry, toss and coat noodles well in sauce.
  8. Divide between two bowls and serve.

I hope you enjoy this recipe, please let me know if you try it and tag me on Instagram @kitchentablebaking!

Peace and love,

G xx